Barbarian DPS Guide for Mod 22
Author: Andiemus@reeper#9973
Last update: 17/03/2022 “I will only be updating when there are major changes buff/nerfs to the Barbarian class. This isn’t a copy and paste build.”


A guide for Barbies
Introduction
I would like to start by mentioning the great GWF’s of the past: Queen Lia Knowless, Unforgiven/Northside and WickedDuck. You guys took the time to write guides and provide us with builds and the necessary information to become better GWF’s. Your contributions have been invaluable to us, for this I thank you!
With the introduction of Mod 16 everything we knew and loved about GWF’s changed and was replaced with the “Barbarian”. Our damage was low compared to other DPS classes and later we learned why. It seems that the way the Damage Formula worked was different for some classes. With the release of Mod 17 Barbarians had to adapt and turn into a Tank class to be able to run TOMM “Tower of the Mad Mage”, because our damage was not enough to be viable. With the updated Damage Formula, released 10/10/2019, DPS Barbarians still didn’t get invites to TOMM farming groups. Wizards, Rangers and Rogues still produced more damage, but the gap was much smaller than it used to be. Then Mod 18 came along and Clerics took the top DPS spot, leaving all other far behind. Mod 19 was released and finally the Barbarian was a force to be reckoned with again.
This guide was originally intended to help make DPS Barbarians viable again. Now it will help you guys maximize your damage in dungeons and trials. If anything is unclear or if you simply want to discuss the guide please feel free to contact me either in-game or on Discord (Andiemus#0752)
Some information about myself: I was fortunate enough to be part of the Mod 17, 19 and 22 beta testing groups on the Owlbear server. I have been running TOMM, Master Zariel and Crown of Keldegonn “Master” with 7 different classes, sorry I don’t play a Warlock or Bard. I have spent a lot of time doing testing on both Preview and Live. Barbarian has been my main character for close to 7 years now. I do not know everything or have all the answers, but I try to learn as the game changes, luckily I know some clever individuals. Be sure to check these out:
https://www.nw-hub.com/mechanics/damagecalc
Understanding how to improve your DPS
I liked the previous system of Stats and Counter stats. It made perfect sense to me, but for some it didn’t. We now have a new Stat system which I will try to explain a bit and also how it impacts a DPS character. I won’t go into details about how the damage formula work, but basically there are a few things we need to keep in mind if we want to do decent damage. Higher Item Level does improve damage as everybody knows, more buffs does this also and so does your stats. Using the damage calculator link above really helps a lot by showing which of those 3 sources will increase your damage the most. Reaching the perfect balance between high Item Level, lots of buffs and good stats is what we aim for. Since there isn’t a number on optimal Item Level or amount of buffs, I’ll explain the optimal Stats.
Stats are split up in 2, in other words we can get stat rating from certain sources like enchantments and we can get the % from other sources like companions. If we have 75000 Item Level, we can get 50% of a stat by reaching 75000 rating. Your rating will turn green when reaching this, if you have more than 76000 it will turn orange. So in other words, by having your ratings equal to your Item level will cap it at 50% and it will turn green while 1000 stats points more than your Item Level the rating will show orange. Any stat rating that is more than your Item Level has no effect. Ideally we want to reach 90% on our stats, so we use other sources that gives % gains. Prioritizing certain stats also gives more benefit because of the way they work. Power and Combat Advantage gives the biggest benefit and should be your focus to reach 90% or as close as possible. Critical Strike and Critical Severity gives a slightly smaller benefit, but still bigger than Accuracy. Only the Accuracy Rating is important for Barbarians, but that I will explain a bit later.
Choosing a Race
My pick would be the Gith. Here are some of the reasons why as well as other alternatives if you don’t have it unlocked:
Gith – You gain 5% Combat Advantage. You regenerate Stamina 5% faster.
Attribute choice: +2 DEX and +2 STR or INT
Other good alternatives:
Metallic Dragonborn – You gain 3% Critical strike and 3% Power . You receive 3% more healing from all spells and abilities. Your maximum Hit Points are increased by 3%.
Attribute choice: +2 on 2 attributes
Dragonborn – You gain 3 Critical strike and 3% Power. You receive 5% more healing from all spells and abilities.
Attribute choice: +2 on 2 attributes
Tiefling – You deal an additional 5% damage to targets below 50% health. Whenever you are hit, you have a 10% chance to lower the damage of the attacker by 2.5% for 5 seconds.
Attribute choice: +2 CHA and +2 CON or INT
Ability Scores
There are only 3 real options here:
For every 4 points of STR you get 1% Physical damage boost and for every 2 points you get 1% Stamina Regen.
For every 2 points of DEX you get 1% Crit Sev and for every 4 points you get 1% Movement Speed.
For every 2 points of CHA you get 1% Forte and for every 4 points you get 1% Recharge Speed
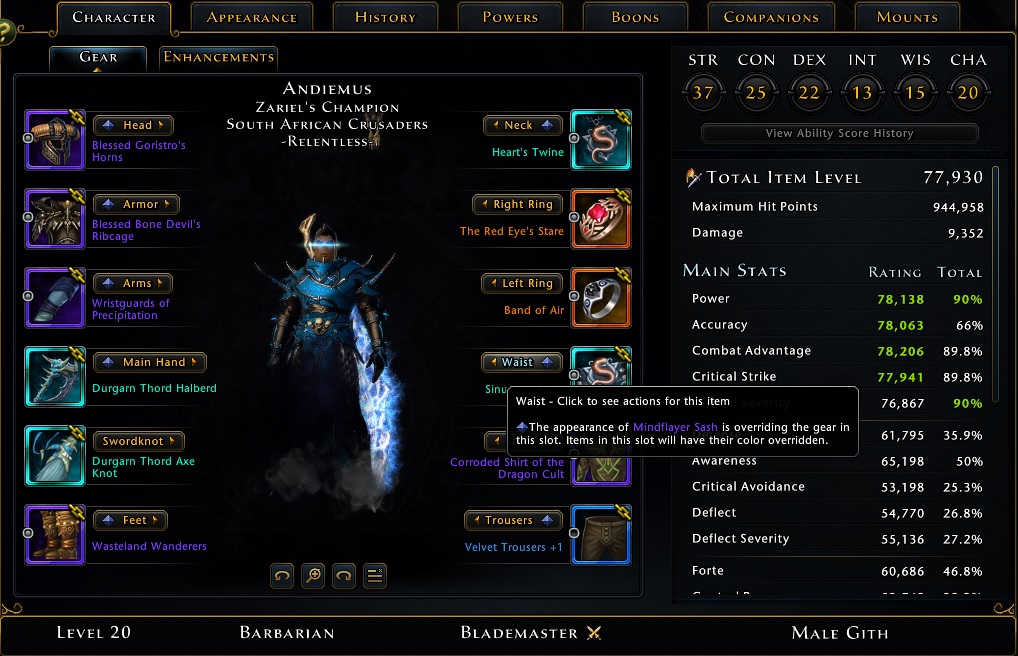
Equipment
Boss Fights:
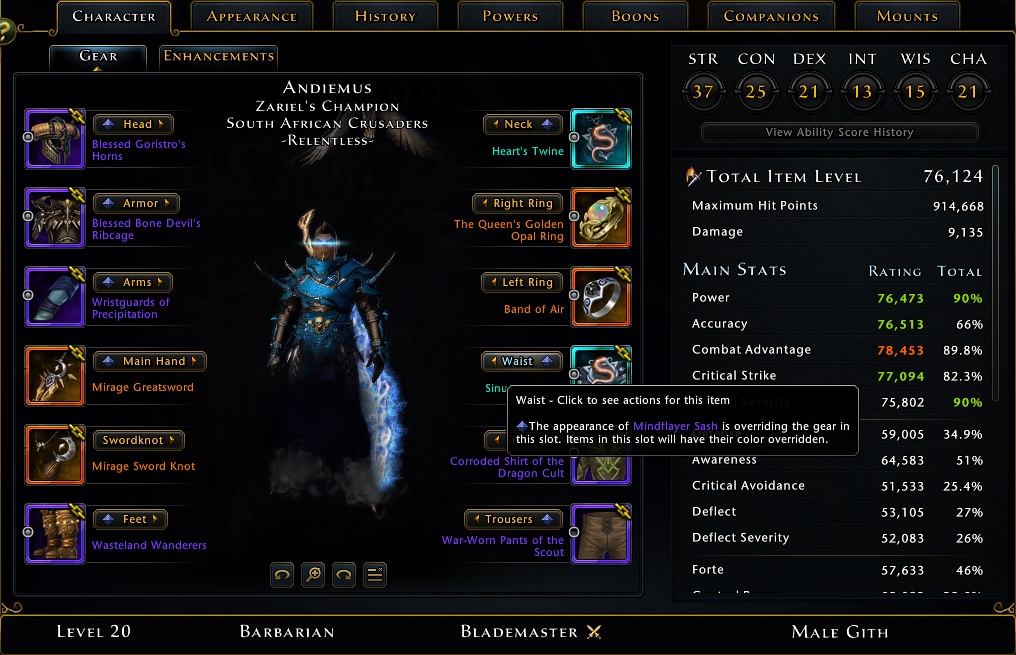
Crown of Keldegonn build with Batiri + Minsc + Neverwinter Knight:
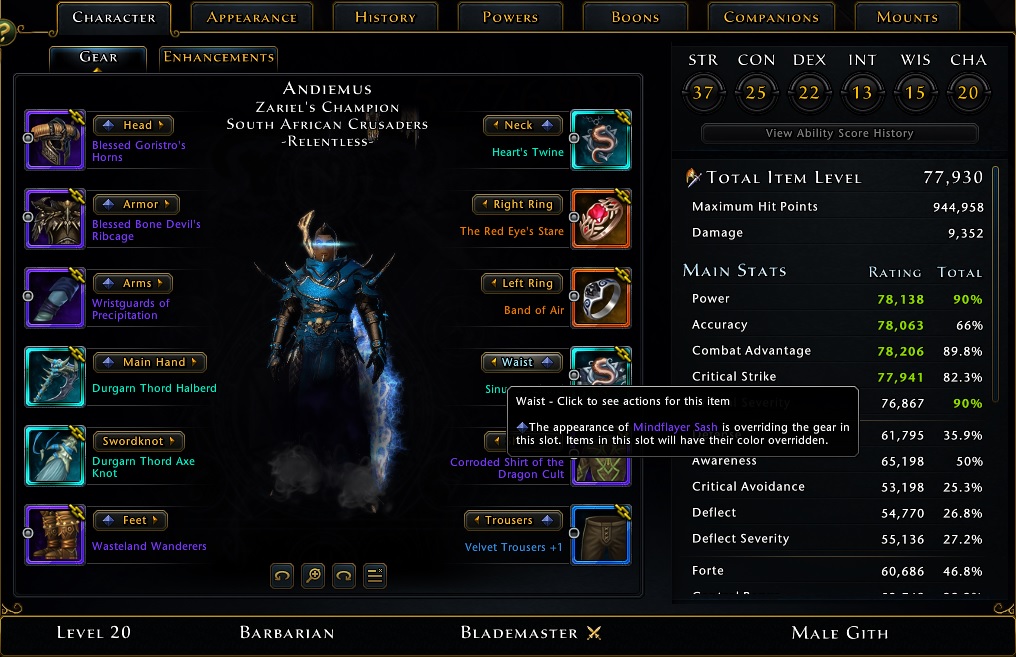
Crown of Keldegonn build with Batiri + Minsc
Some equipment pieces have damage bonuses on them these days, some of these bonuses stack while others don’t. Here is a short summary of the bonuses that stacks:
Swordman’s Perk: +3% damage buff for Melee Powers: stacks only twice
Sniper’s Perk: +3% damage buff for Ranged Powers: stacks only twice
There are a lot choices for equipment these days. Higher Item Level plays a factor, but some of the older gear are still much better because of their bonusses. I’ll just briefly mention my top picks:
Head
Goristro’s Horns: +10% Critical Strike – Needs time to stack up to 10
Alternative:
Alliance Soldier’s Helmet: +7.5% Accuracy – Stamina needs to be over 75% “Don’t waste Stamina!”
Armor
Bone Devil’s Ribcage: +12.5% Critical Strike, +12.5% Critical Severity
Alternatives:
Alliance Soldier’s Cuirass: +7500 Power when in party of 5
Order Mercenary’s Breastplate: +7500 Power when in party of 5
Midnight Cuirass: +3% damage when attacking from behind
Arms
Wristguards of Precipitation: +375 Power on every attack. Stacks 20 times and drops off 10 seconds after reaching 20 stacks. By using Bloodletter we damage ourselves and take away one of those stacks, thus refreshing the timer. This allows a good uptime for the buff
Alternatives:
Spiked Defender Vambrace: +5% Damage. We use Bloodletter to damage ourselves and active the 5% damage buff. This allows a good uptime for the buff
Lion Guard Raid/Ward Vambraces: +250 Power on every attack. Stacks 20 times and drops off after 10 seconds
Templar of the Twilight’s Bracers: +3% damage buff for Encounters
Sentinel of the Star’s Bracers: +3% damage buff for At-Wills
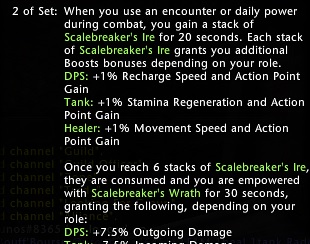
Weapon set
Choosing a weapon set can be tricky. Some sets perform better on different scenarios.
Scalebreaker’s Wrath Set: After using 6 encounters or daily you 7.5% Outgoing Damage for 30 seconds. Also some Recharge Speed and Action Points when using encounters while busy stacking your Scalebreaker’s Ire. When entering a boss fight I animation cancel casting Frenzy to get some of those stacks before even attacking the boss.
Alternatives:
Mirage Set: Summons 3 copies of yourself for 10 seconds with 30 second cooldown
Celestial Set: After using 5 encounters or daily you get +7.5% Outgoing Damage for 30 seconds. When entering a boss fight I animation cancel casting Frenzy to get some of those stacks before even attacking the boss.
Lionheart Set: Increases damage dealt and outgoing healing by up to 7.5% whenever your stamina is full. Effect decreases as stamina decreases. Decreases damage received by up to 7.5% whenever your stamina is empty. Effect decreases as Stamina increases
Set of the Watcher: At the start of combat your Power, Critical Severity, Critical Strike and Defense is increased by 1%. For every 5 seconds your are in combat, these increase by 1%. “Max 5% increase”
Masterwork Set: +2% Outgoing Damage, Outgoing Healing and -2% Incoming Damage for each party member that has Masterwork weapons. 10% on those bonusses with a full party using them
Primal Weapons should be on this list because of the 10% buff to damage they give, but sadly they aren’t available anymore
Feet
Wasteland Wanderers: +5% Combat Advantage
Alternatives:
Forest Guardian’s Raid/Ward Greaves: +7500 Combat Advantage when stamina over 75%
Rusted Iron Leggings: +5% damage buff, -25% Incoming Healing
Primal Raid/Assault Lapulapus: +3% Action points for each enemy killed
Neck
Heart’s Twine: Part of the set Demogorgon’s Wrath
Alternatives:
Mythallar Shard: Part of the set Mythallar
Starshard Choker: Part of the set Star
Rings
Band of Air: 10% chance to do extra damage on attacks. This ring never gets swapped out. “Took me over 500 completions for VOS HC to make this ring”
Choosing the second ring depends on a few things like types of enemies or stats needed. Here are a few options:
The Queen’s Golden Opal Ring: +3% Melee Damage buff
The Red Eye’s Glare: +5% Power, +2.5% Accuracy
Red Eye’s Stare: +10% damage buff vs Undead
The Queen’s Silver Leafed Ring: +10% damage buff vs Constructs
The Sky’s Peaking Light: +5500 Accuracy
Striking Ring of the Veteran/Master: +3% Melee Damage buff “If you cannot run Vault of the Stars yet, i suggest using 2x these rings”
Waist
Sinuous Chord: Part of the set Demogorgon’s Wrath
Alternative:
Mythallar Piece: Part of the set Mythallar
Twinkle of the Star: Part of the set Star
Shirt
Corroded Shirt of the Dragon Cult: +5% Combat Advantage
Alternatives:
Upper Pact Brands of the Blaze Bond / Upper Pact Brands of the Inferno: +5000 Power when Stamina is over 75%
Ebony Stained Shirt: +3% damage buff when Stamina is over 75%
The Ebony Shirt has different versions, with different combinations of stats which might help with stat balancing.
Shirts from Vault of the Stars Hardcore 3rd Mini Boss with 1525 Item Level are another option. They have a 10% chance to reduce your cooldowns by 1 second every 5 seconds whenever your powers does a critical strike.
Pants / Trousers
Velvet Trousers/Pants +1: +690 Accuracy, +1035 Critical Strike or Combat Advantage and a 10% chance to gain 25 Action Points on a critical hit. 5 second internal cooldown
I’m using these purely for the Offensive stats. I won’t be providing any alternatives for this reason.
Artifacts
Primary Artifacts
Envenomed Storyteller’s Journal:
+5% damage buff
20 Action Points per second for 16 seconds “tooltip says 15 seconds”
It also stuns mobs for 4 seconds.
Alternatives:
Decanter of Atropal Essence:
Up to 10% damage buff for roughly 30 seconds, sometimes even longer
Soul Sight Crystal: +25% damage buff against a single target for 10 seconds
Secondary Artifacts
There are a lot of options for secondary artifact, again I will mention my picks and some alternatives
Demogorgon’s Reach:
This is needed to complete the Demogorgon’s Wrath set. +5% damage buff
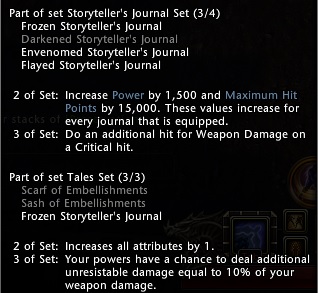
Choose 2 of the following to complete your artifacts:
Frozen Storyteller’s Journal
Flayed Storyteller’s Journal
Darkened Storyteller’s Journal
I use the Storyteller’s Journals because of the wonderful multiple set bonuses they currently have.
Alternatives Artifact sets:
Mythallar Fragment:
This is needed to complete the Mythallar set. This set is only good on boss fights since its an extra hit on Combat Advantage hits. Using it with the Band of Air makes is almost or maybe even better than the Demogorgon’s Set.
Sparkling Fey Emblem:
This is needed to complete the Star set. Still a very good artifact set if you cannot get the other 2 options.
Alternative Secondary Artifacts:
Neverwinter’s Standard
Jewel of the North
There are too many options to mention all, I’m mentioning these since they have 1200 Item Level compared to others with 600.
Powers
At-Wills
Relentless slash is our only AOE at-will that we can use for clearing mobs. It also applies a 5% damage buff, active for 12 seconds.
Relentless Slash has a two fold attack mechanic, each dealing 55 magnitude damage with an “Avatar” doing the second hit. This makes killing mobs extremely light work when in battlerage.
“Avatar” – The mirror image of your character that spawns on the other side of your target.
Brash Strike has been buffed a few times since its release in Mod 16 to the point that it’s the only viable option for single target fights. Every hit does 140 magnitude damage.
Encounters
For Mobs:
Mighty Leap has a magnitude of 325. The feat Mightier Leap increases that to 780. “Tool tip is bugged” How to use this will be discussed under Rotations, a bit further down.
Not so Fast has a magnitude of 235 and slows enemies for 6 seconds. This is used to proc Trample of the Fallen, which will give both the 5% for 10 seconds and 10% for 6 seconds buffs.
Bloodletter has a magnitude of 520. The feat Bloodspiller increases that to 920. This is our second hardest hitting encounter and should never leave your bar.
For Bosses:
Punishing Charge has a magnitude of 650 and procs Trample of the Fallen. It also helps closing the gap between you and your target.
Frenzy has a magnitude of 1275. This is your hardest hitting encounter. The cooldown has been reduced even further with mod 19, so now everybody has finally seen the light and started using this skill.
Bloodletter has a magnitude of 520. The feat Bloodspiller increases that to 920. This is our second hardest hitting encounter and should never leave your bar. Yes, it does a little damage to yourself, but you can always blame the healer for not keeping your Hit Points full all the time.
Alternative to Punishing Charge:
Indomitable Strike has a magnitude of 750 and a shorter cooldown than the other hard hitting encounters. DO NOT use the Indomitable Rage feat that increases it to 1050. The reason for that is, your rage has to be full to hit with 1050 magnitude. There is also a bug currently with feat explained under the “Feats” section.
Dailies
Avalanche of Steel + the feat Steel Slam might be the most amazing Daily ever! It’s a must have for Mob fights.
For Boss fights I prefer Savage Advance over Crescendo. Crescendo channels for three seconds while doing a multi-hit combo. Savage Advance has a one second cast time with one big hit.
Class Features
Trample of the Fallen has two different damage buffs. The first part gives a 5% buff for 10 seconds after casting a Control Power, like “Not so Fast” “Punishing Charge” “Roar” “Savage Advance” “Crescendo” “Avalanche of Steel”. The second part gives a 10% buff while the target is controlled. That means on Mobs and Bosses that are controllable you could have a total of 15% damage buff for however long the control effect is active. Sadly, the second part of the buff does not work on Control immune targets, basically most of the bosses we face. The Swarm Mount Power however does put a slow effect on bosses which allows the 10% damage bonus to work during Artifact calls.
Steel Blitz does between 5 – 6% of my total damage.
Using any other Class Features will surely cause the bosses to die of old age.
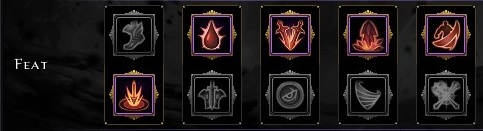
Feats
Mightier Leap upgrades Mighty Leap to a Mob killer. From 250 magnitude to 780. Mobs just melt when using this correctly.
Since mobs die so quickly and we do not use Not so Fast on Bosses, we do not need the feat Relentless Speed.
Bloodspiller upgrades Bloodletter from 520 magnitude to 920 and reduces the cooldown by 3 seconds. Also it causes Bloodletter to do damage to yourself equal to 20% of the hit mitigated by your Defensive stats.
Indomitable Rage actually increases the magnitude by up to 400, but it also decreases the base damage of IBS to 650 from 750, another bug sadly. So max damage is 1050 in the end in both ways.
Overpenetration gives you a 5% Damage buff when your Power and Accuracy Rating is capped. This means if you have 75000 Item Level, the buff will be active when you have more than 75000 Power and Accuracy. This buff seems to be only working for At-Wills, Encounters and Daily powers.
Choosing Brutal Critical increases Rage by 2 for every critical attack. This option isn’t terrible if you simply cannot get your Power/Accuracy ratings capped. It does actually increase rage on the rage bar, but its only visual and it doesn’t actually extend the duration. So it only works out of Battlerage.
Steel Slam upgrades Avalanche of Steel to probably the best AOE daily and certainly the best looking in my opinion. This is not 250 magnitude dot, its 325 magnitude and during 12 sec duration it procs 5 times, making this feat 1625 magnitude AOE dot damage plus 900 magnitude from daily itself. When timed correctly you’ll be like the Mafia and just make all the mobs disappear. “Get Marduk to read this in his Italian accent”
Unstoppable Spin has no use since nobody should be using Spinning Strike.
Relentless Battlerage helps you build Rage twice as fast, but Battlerage only increases damage by 14% instead of 20%. Rage builds really slow without this feat, it’s still not lightning speed with the feat but a lot faster. Maybe someday we won’t need to select this feat at all, but surely we aren’t selecting Escalating Rage. Who wants to be stunned for 3 seconds, waiting for all those red areas to kill you?
Rotations
Mobs
When running up to a group of Mobs, identifying if they have any control abilities such as interrupt, stun or knock back is very important. If you aren’t sure rather play it safe and assume they can, for this I would recommend starting the fight this way:
Mobs that could possibly control you:
Use Mighty Leap and aim for a safe spot, be sure not to hit any targets. This procs your Mightier Leap Feat, increasing the next jump to 780 magnitude. Try aiming this to hit as many mobs as possible. If there are mobs that survived, use Not so Fast to proc the 15% buff from Trample of the Fallen. Spam Relentless Slash and activate Battlerage while still spamming Relentless Slash. If any mobs still survive, use Not so Fast when it comes off cooldown for the 15% buff while still spamming Relentless Slash.
If you know the dungeon well and know the next group of mobs does not have control abilities, I recommend starting the fight this way:
Mobs that cannot control you:
Use Mighty Leap and aim for a safe spot, be sure not to hit any targets. This procs your Mightier Leap Feat, increasing the next jump to 780 magnitude. Run into the middle of the mobs, Use Relentless Slash for the 5% buff, followed up by Not so Fast for the 15% buff and then use your second Mighty Leap and aim it on the same spot you are standing. This should melt away almost any group of mobs. Spam Relentless Slash and activate Battlerage while still spamming Relentless Slash. If any mobs still survive, use Not so Fast when it comes off cooldown for the 15% buff while still spamming Relentless Slash.
For both situations: Use Bloodletter to finish off any surviving mobs. Usually there is at least one elite mob that might be too stubborn to accept defeat.
Bosses
When starting a Boss fight, always wait for the tank to grab aggro and position the boss. Never stand on the tank’s side. Sometimes they turn him around, other times you have to run to get behind the Boss. You want to fight the boss while having someone on the opposite side of him, this way you gain Combat Advantage which is very important.
So you start with a Relentless Slash for the 5% buff, followed up by Punishing Charge, Frenzy and Bloodletter. This will put your Rage high enough to activate Battlerage. I basically use those encounters to gain Rage because using At Wills takes too long to gain Rage. When activating Battlerage you want to spam Brash Strike until Battlerage runs out. Remember to use Relentless Slash once every 12 seconds. Bloodletter can be used while Battlerage is active because of its low cooldown, but not when its about to run out. Then rather wait and use all the encounters again to build Rage.
For an “artifact call” in a Trial or Dungeon it’s important to have your encounters off cooldown and ready. Everybody is usually assigned a debuff artifact, so when the call comes I do the following:
Use artifact, Relentless Slash, Punishing Charge, Frenzy, Bloodletter, activate Battlerage, start using Brash Strike and use Savage Advance + Toad/Tunnel Vision. Continute spamming Brash Strike until Battlerage has run out. Start with the rotation again as explained above.
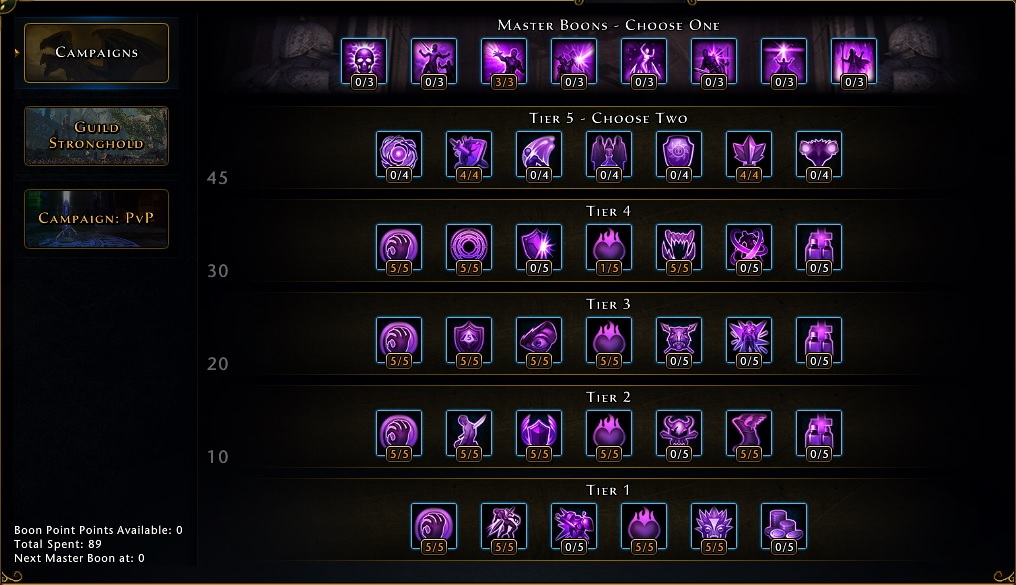
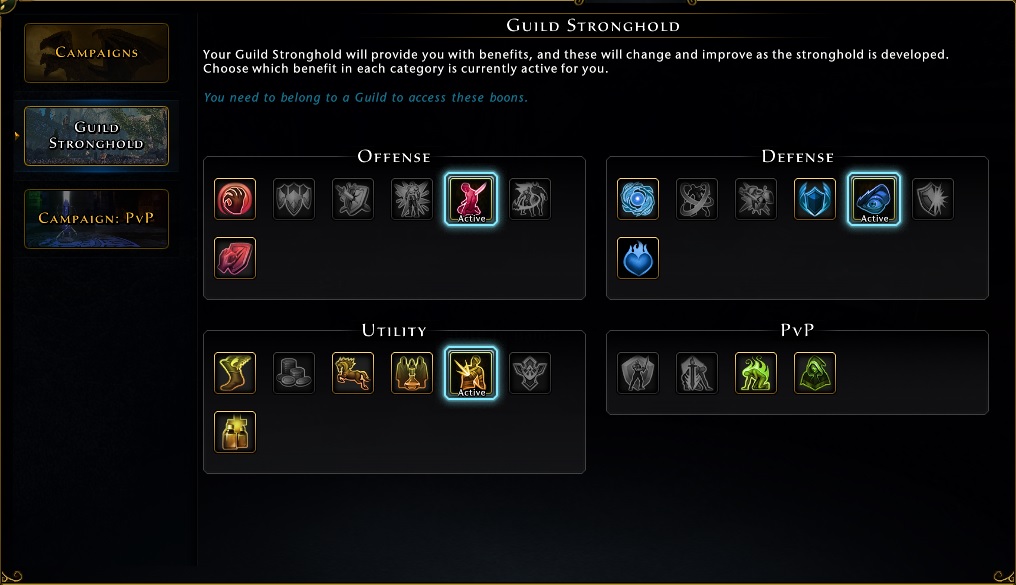
Boons
Boons doesn’t make a big difference most of the time, but since we have them we might as well use them wisely.
Running dungeons, using the Revive sickness boon is the best option.
The Mount Speed Bonus boon is really nice for just general play and questing.
Companions
Boss Fights
Since Batiri is only good vs Bosses, be sure to swap it out for something else on Mob fights.
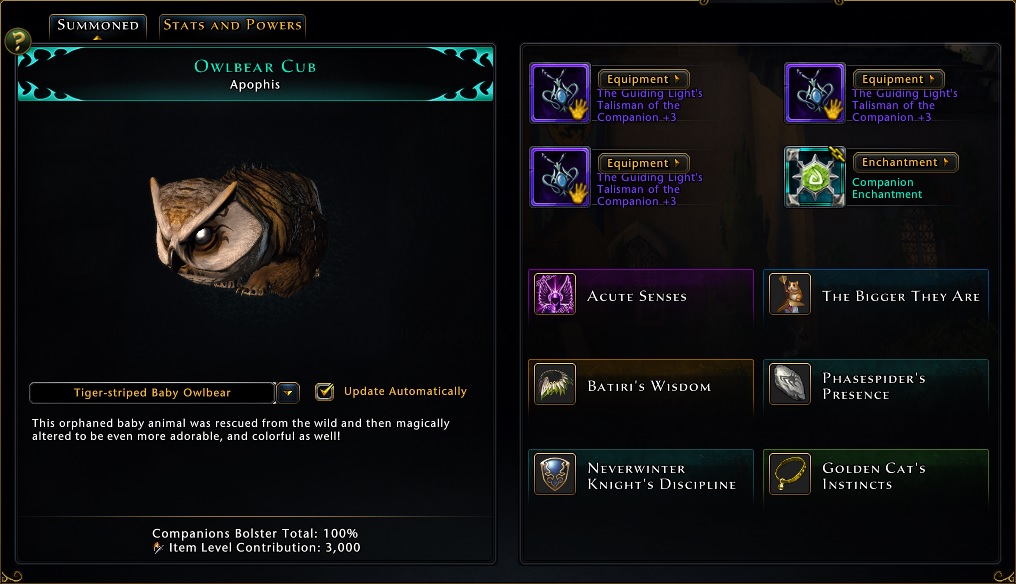
Summoned Companion
Since Summoned companions have been getting nerfs like Xuna, Cold Iron Warrior and Air Archon the Augments have been the better option since the major boost in stats they give. Some Summoned companions can still be better than Augments in certain scenarios, but it comes down to how much damage they do vs the damage increase you get from the stats gained by using an Augment.
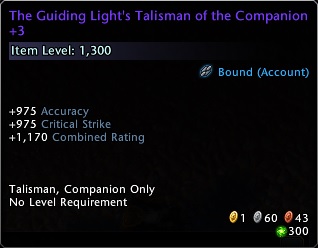
Owlbear Cub – Augment Enhancement: 2250 Accuracy/Combat Advantage/Critical Severity
The Owlbear Cub is the only available Augment that has 3x Offensive stat Enhancements. Augment Enhancement are extra stats that Augment companions have.
Enhancement Power
Acute Sense has a chance to increase your Combat Advantage with 7.5% for 15 seconds.
Player Bonuses
Selecting companions for these 5 slots all comes down to what bonus or stat they give. Some bonusses are superior to stats depending on how much bonusses you already have since they are an additive bonus.
My top picks:
Batiri: 11% damage buff against Bosses
Minsc: 5.6% – 8.6% damage buff “This bonus works on enemies with 3 star and above”
Neverwinter Knight: 7.5% damage buff
Golden Cat: 7.5% Combat Advantage
Staldorf: 7.5% Combat Advantage
Phase Spider: 3.8% Combat Advantage, 3.8% Critical Strike
Alchemist Experimenter: 3.8% Combat Advantage, 3.8% Critical Strike
All stats shown are at Mythic quality.
Companion Gear
These are my personal choices, but it all depends on which stats you need to get them balanced.
Mounts
Equip Power
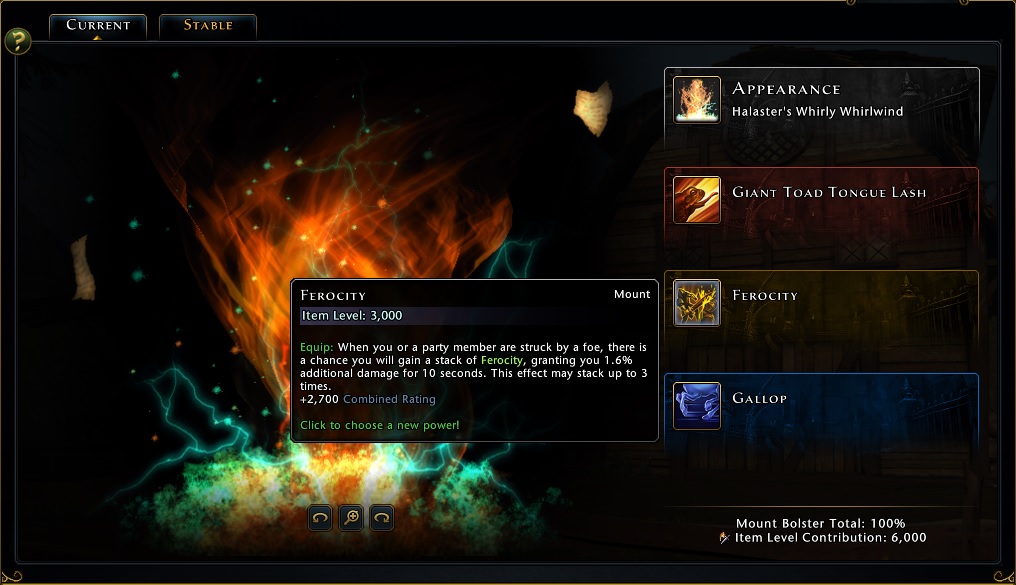
This is used to proc the Band of Air more frequently. Seeing as I dont need any more stat ratings…
Combat Power
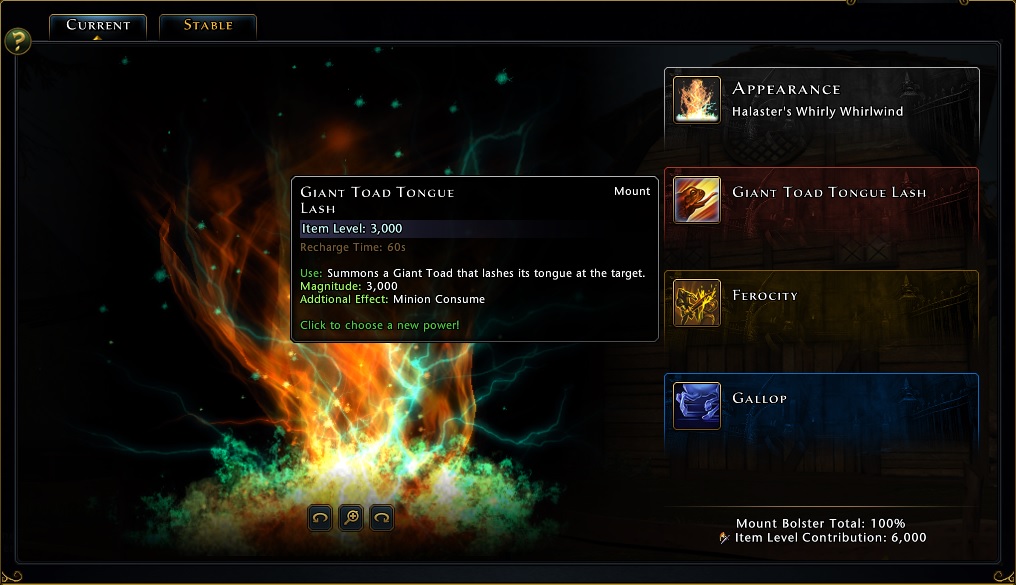
There are a few different powers like this with the same 3000 Magnitude hit on a single target: Giant Toad Tongue Lash, Tunnel Vision, Golden Touch
Insignia Bonuses
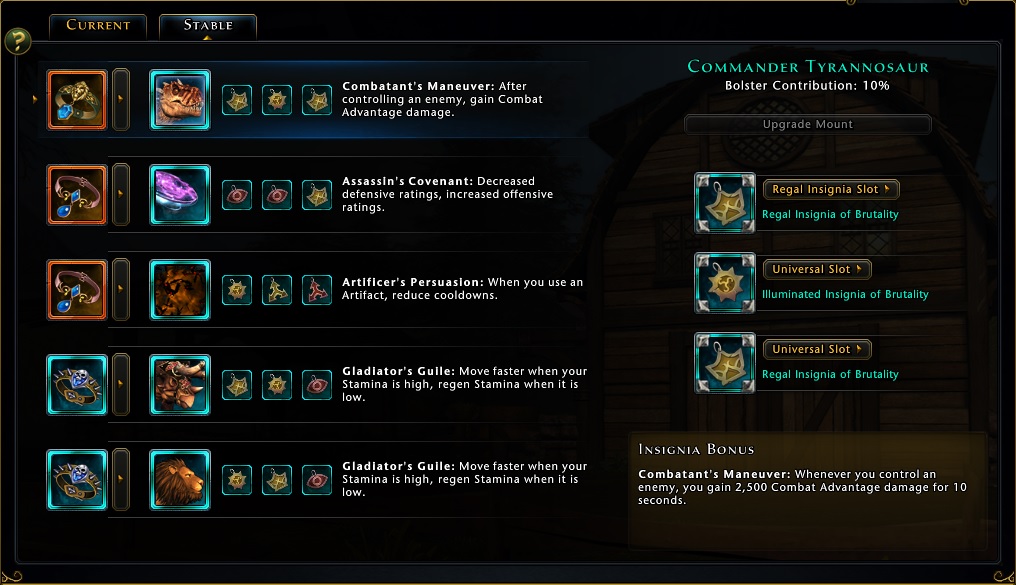
I recommend using Dominance, Brutality and Skill insignias.
Artificer’s Persuasion:
Reduces cooldowns by 2 seconds after using an Artifact.
Gladiator’s Guile:
I feel the NEED………………………………………………………………………… For SPEED !
Who doesn’t like being fast?
I’m using 2x Gladiator’s Guile so that I don’t have to spend stamina all the time getting out of red areas and back to the fight.
Combatant’s Maneuver:
Adds 2500 Combat Advantage, should help to reach some of the high stat caps. Unfortunately some of my Control Powers does not proc this bonus against some bosses. This might have been fixed, bugged again… I cant keep track.
Assassin’s Covenant:
Decrease Defensive stats by 1000 and increases Offensive stats by 1000
Using multiple Insignia bonusses does stack, but with 50% less with every stack. Artificer’s Persuasion does not stack.
Collars
I’m using the following:
Sturdy Barbed Collar: At-will Powers do more damage
Wayfaring Barbed Collar: Critical Severity is increased
Unified Crescent Collar: Movement Speed is increased
Supportive Crescent Collar: Stamina Gain is increased
Practical Regal Collar: Rough Astral Diamond Drops are increased
Enchantments
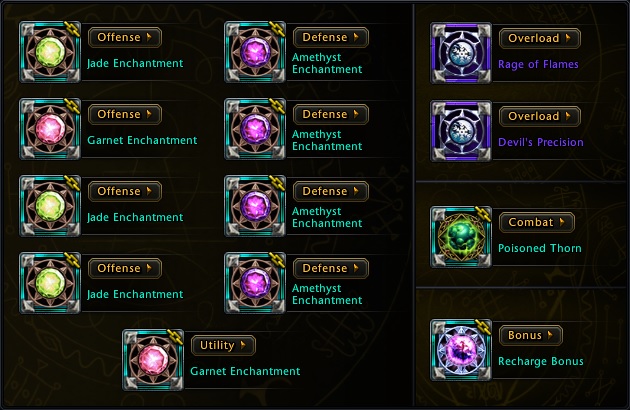
Combat Enchantment
Poisoned Thorn enchant seems to be the best since there aren’t many to choose from. It does about 3% of my total damage.
Offense slots
These all depend on which stats you need
Defense slot
Amethyst enchansments would be the best in my opinion to boost your Awareness stat.
Utility slot
Garnet enchantments add Forte. I believe there are no real other choices here.
Bonus slot
Recharge bonus or Movement bonus would be my choices here.
Overload slots
Rage of Flames:
+5% damage buff
Devil’s Precision:
+5% Critical Strike, +5% Accuracy
Alternative:
Corrupt Black Ice/Lethal/Piercing:
Chance to give 800 Power/Critical Strike/Critical Severity and 1.25% AP gain for 8 seconds. Different ones does stack
Undread/Dragon Slayer Overloads from the Stronghold are great when doing Crown of Keldegonn. +5%/10% Damage vs Undead/Dragon type enemies.
Consumables
For consumables you want to buff your stats as much as possible. You are only allowed to use one of each of the following groups:
- Elixirs
- Potions
- Event Food
- Stronghold Food – Sadly nerfed into the ground and not very useful these days except maybe 1
These are my choices:
Sunlord’s Gift Elixir grants 2000 Accuracy and 5% Combat Advantage
Crafter Potion of Accuracy Rank 4, +1 grants 3600 Accuracy
Watermelon Sorbet grants 10% Power and Accuracy
Sambocade grants 1429 HP + 5% Movement Speed
There are many different Elixirs, Potions and Event foods to choose from. You need to figure out which stats you need from them to reach 90% in a certain stat or get as close as possible.
Event foods does not persist through death.
Credits
I would like to thank the Academy, err wait this ain’t the Oscars…
There are a few I would like to thank:
- My South African group of guys putting up with my dry sense of humor.
- Puggernaut err i mean Juggernaut for proofreading and supplying some extra info about some game “features”. Also for always being available to chat and discuss Barbarian stuff.
- Janne for making a few suggestions and for hosting this guide on her website.
- Everybody for taking the time to read it all the way. Hopefully the guide ended better than Game of Thrones: Arya went West, Drogon went East, Jon went North and the writing went South…
Hi Andiemus,
which armor kits / jewels do you use and which artifact modification + artifact class feature ?
Ty and Greetings 🙂
Which ever kits are needed to cap the stat ratings. With new Masterwork potions that came out, there are different options again.
Hi, and thanks for the build, where I can get Corroded Shirt of the Dragon Cult
Hi, its found in Dragonborn Vale from one of the Minibosses
thanks for sharing your experience and knowledge, hot Pizza came! buff up mighty GWF s use knowledge and be “geared” to fight back from devs our glory dayes!
Hey guys! Just a quick update, the guide should be updated soon. Thx for your patience.
Sorry for only doing this now. Having a baby changes things. Covid + Lockdown + Starting a new business takes priority.
How long is it going to take mod 22 will be out before this gets updated
I mean I wasn’t wrong
Sorry, but it’s not for mod 21.. bonding runestone it doesn’t exist anymore… i hope that this guide will update for real, because it was a really good guide.. but don’t write mod 21 if it doesn’t 🙁
Hey, still working on it?
I don’t think. but, at least, he should remove that “mod 21” tittle or update this build. new players can get baited on it
Hey guys, I will be working on updating this guide for mod 21. Please be Patient or contact me on discord. Thanks
Hi, thank you for the guide. I noticed that you wrote that Dragonborn has a bonus of 3% damage. The tooltip changed a while back and I do not see anything that indicated the damage bonus. Would you verify or clarify that for me?
Thank you
Yes, like i mentioned at the very top, everything in the guide is still for mod 19. Dragonborn now has +3% power and +3% critical strike
Great guide! Thank you
Witam masz lub będziesz miał bilda na barbariana mod 20 ?
Hey guys. I’ve been taking a break from the game for the last 2 months and focused on family and real life. I don’t like the direction the game took and think it makes everything harder to understand fully. Stats and counter stats was perfectly easy to explain. I will need to test everything again before I can release new info, this will take time if I decide to play again. I’ll keep you guys updated from time to time. Message me on Discord if you have specific questions.
What’s your Discord mate?
andiemus#0752
Hey, please tell me you’re working on mod 20 i need it!
Hey,
I wanted too know if you are working on a new build with the huge changes 🙁 i suck atm.
Hey, I just wanted to know if you’re working on a mod 20 build.
I also need a mod 20 build for barbarian because my barbarian toon is bugged or somthing I do low damage and I’m 48 Item level , like in a rtq some low 40 Item level do more damage then me..
Hey. Except Relentless at will, the rest of our powers have range description. Isnt better that we use a guiding ring for example?
Most powers says the range is Melee. The powers that has a range of a few feet does not benefit from the +3% dmg to range powers buff. I tested this, they still benefit from the Melee buffs since you still attack with those powers using a Melee weapon. The 2 powers that actually are ranged powers “Axestorm” “Hidden Daggers” are projectiles. Thus they should benefit from the Ranged buff, but I didn’t test them since no self respecting Barbarian should be using them.
Hei, what mount collar are you using for you build?
Hi, +Encounter power damage and +Crit Sev
Gdzie zdobyć mounta dominanta Force?
I don’t understand, but I’m pretty sure the answer is within Rainer’s Wiki page 🙂
Q about bilethorn with the slow feature on it would it proc trampel of the fallen
On mobs yes, but since bosses are control immune it doesn’t proc on them.
Hi, someone can tell me why in this Setup every Ability Slot has 2 Points more than my? I saw it often at other characters too.
If not mistaken it’s the tale books gives more ability points if 2 books or more
Yes, 2 Storyteller Journals gives those ability scores.
what about collar’s. I wonder if barbed collar 3 , giving a 3% more damage buff stacks with the twisting gold ring?
Since most of our damage comes from Encounters, I would suggest using the +Encounter damage collar and the +Crit Sev collar. Movement speed/Stamina gain/Incoming healing would be worth looking at also.
does the encounter damage collar stack with the gold-plated ring?
Hi :D, where we can fin this Scavenger’s Chainmail: +10% Power
This is a drop from undermountain. Currently the only way for this to drop is by either farming runic corruption events in Terminus (Lava Area) or, by leveling a Ranger (Weird and broken I know), fighter or barbarian (From my knowledge) to 75 and opening slime covered packs which you would transfer over from your main. Most find the ladder to be more efficient seeing as how low the drop rate is in runic corruptions.
Thanks
I am lvl 80 on my barbi and have a lvl 72 ranger alt is it possible when i buy the box with my ranger and get the chainmail yoo transfer it too my barby
Is deepcrow better better than batiri in dungeons like ic
yes, because batiri only works on bosses and we only have 1 offense companion slot…
I meant bariti vs deepcrow in boss fights
Thank for the response
batiri and deepcrow is so close to being the same, you might as well run with deepcrow permanently
Does anyone know where I can get “Scavenger’s Chainmail?”
Terminus, or make a lvl 75 character and open slime boxes 🙂
If your wife knew how much real money you spent she prolly wouldnt be too happy. even if you make more than 200k a year.
Its been a long time since I’ve used real money to buy zen, a few years at least. I buy zen with AD. If you play long enough it’s really easy to generate a lot of AD by farming dungeons. If you work and train hard and get into runs early like TOMM, it’s quite possible to make millions of AD like everybody else when we just started completing it.
Hi, I don’t where did u get that much defense. I got almost the same stuff (don’t have the slime but even with guild boons I can’t get to 80k defense. Where did you get 87k defense without guild boons ??
You have to remember, every little bit counts at the end. I have everything maxed. Even companion bolster maxed, not that it gives much but still…
Which companion skill would you rather use for ToMM/Zariel on offensive slot? Would batiri be BiS?
Since we only have 1 offense companion slot, if possible I would use Tamed Velociraptor since the 10 000 power gets increased by my Alpha compy and the chest piece I’m wearing. This means the raptor is giving about 12 000 power, which gives just a little more than a 3.5% increase in damage. The Batiri says 4%, but this is additive to your other buffs. This means if you have all the best gear that gives percentage bonusses, the Batiri gives less than 3% damage bonus.
Good to know! I was testing batiri and seemed to work well but if raptor helps more I’ll try it out in the long run! Thanks for answering and good guide btw 😀
Thank you! I’m glad I could help
Does that mean that deepcrow would be better than batiri in dungeons like ic
Which set is better mad mage set, music box set or vile book set
I see your using the mad mage set in the pictures
foe barbs
The difference between these sets are very small. If you are doing something like TOMM and you know how to stand still for long periods, then Mad Mage set is giving 5% bonus damage. If you have trouble standing still in TOMM or doing a dungeon like IC, then Vile book set is better because its always giving at least 2.5% damage bonus. If you have excellent AP gain and boss phases are really quick, then Music box set might be better. The difference is about 2.5% max. Most of the time it’s only about 1% difference.