
Introduction
First, let me start off by saying that I am no master. After almost 3 years of playing this game, I’m still learning things. Things that I hope will eventually make it into this build. What I am though, is confident enough to say that my Warlock is in a “good place”. I am one of the Captains of Wyld Mutiny, a guild on PS4. This means my testing capabilities are restricted to what I can do on that platform.
Secondly, this is just a build rather than a guide. At this time I will not be giving in depth info, I will try to explain things that are relevant to this build though. I’m writing this as a lot of my guildies are asking for build info. This leads to many PSN messages whizzing back and forth, which is okay. However, I can’t help thinking this build may save some time.
Thirdly, I don’t expect everyone to just copy this build blindly, nor to agree with some of my choices entirely. I’m more than happy to take any advice, constructive criticism or to engage in conversation with people about this build. After all, this build is an ongoing process and some things are subject to change (Cryptic catchphrase). Considering some of the material on MMOminds, I’d say I’m at least equally qualified to type up a build.
For reference, the pictures I will be using in this guide will be set for Tower of the Mad Mage stat caps
Hellbringer
Race
They totally trashed Human, so the old way of squeezing out dps with Blood Pact of Cania is dead.
Fugly Dragonborn (Metallic or standard) is the way now. 3% damage increase with 1500 (3%) crit chance thrown in for good measure. I guess the 5% healing boost is a nice touch too, not a dealbreaker, but a bonus for mod 16.
Don’t want to pay for ugly? Go Tiefling for a 2.5% damage increase. Should you be a roleplayer, choose whatever you want.
Ability Scores
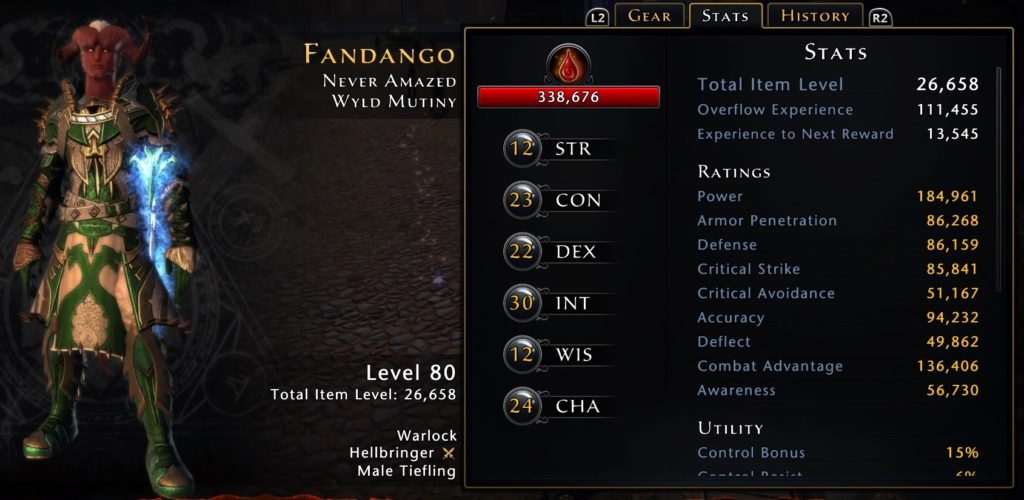
Well this has been done for you (thanks devs!). I’ve maxed Int, for the magical damage boost, and Dex for the crit severity and speed boost. The extra companion influence from Cha isn’t that amazing, so I’d steer clear of it, even if it seems attractive.
Mechanics
Curse
Warlock’s Curse is now a feat. Curse is the mechanic that we use for curse consume and curse synergy effects. Warlock’s apply Curse via encounter powers that have no curse synergy or curse consume effect. At the time of typing this includes: Fiery Bolt, Arms of Hadar, Infernal Spheres, Killing Flames and Hellfire Ring. You can also slot All Consuming Curse class feature which applies lesser curse through at will usage.
Shadow Slip
Our dodge/shift function is what I feel to be one of the coolest in the game. It gives us 100% damage resistance upon initial activation, decreasing by 20% every second until stopping at 40% damage resistance. It also makes us immune to control effects whilst shadow slipping. It’s great for avoiding large red areas, or just to activate any time an enemy uses a control effect. I usually activate it, slip a small distance and then pop an at will to bring me back out of Shadow Slip.
Soul Puppet
This is an interesting mechanic, however it has its flaws. Warlocks have a few powers that can summon a Soul Puppet: Hadar’s Grasp, Killing Flames (has to be a killing blow) and Accursed Souls. This was all we could do before, but a change to the Class Feature Dark Prayers has given a greater degree of utility to the Soul Puppet and the Risky Investment feat, allowing the Warlock to make use of Soul Investiture stacks in AoE scenarios.The puppets actual damage output is relatively weak, and buffing it with the Soul Desecration feat doesn’t yield much higher results, making it a poor feat choice compared to Risky Investment. Furthermore, the Soul Puppet’s AI is poor and you can often rely on your puppet to stay in the red and get killed, losing your Soul Investiture stacks in the process. Nonetheless, the encounter damage buff we get from Risky Investment is too good to pass up, so low puppet damage and stupidity are just the price we pay for better DPS.
Soul Spark
Warlocks can hold up to 30 Soul Sparks at any time. We gain Soul Sparks by using various powers. Soul Sparks offer a passive damage buff of 0.25% per spark, increasing our damage by 7.5% when full. Outside of combat, we consume our Soul Sparks, healing us for 0.5% of our hit points per spark.
Soul Scorch
The Warlocks R1, Tab, RB is a power that does reasonable damage, we can buff the DoT portion with the Double Scorch feat by 10%, and is worth doing so seeing as we’ll also be using the Soul Spark Recovery feat to reduce our cooldowns by 3 seconds every time we cast Soul Scorch. However the power also works counter-intuitively with our self-buffing capabilities. Every cast of Soul Scorch will reduce our damage buff from Soul Sparks by 4.5%. Perhaps not a vast amount, but well worth considering when casting your hardest hitting powers.
Stat Priorities
Offense
Okay, below is a table of what you will want to stack into each offensive stat to be effective against enemies in Infernal Citadel. Essentially, these are the endgame stats you are aiming for. Prioritise: Arpen>Accuracy>Crit>CA
| Stat | Rating |
| Armour Penetration | 85000 |
| Accuracy | 85000 |
| Combat Advantage | 135000 |
| Critical Strike | 85000 |
Combat Advantage is by far the hardest to cap. Many players go without fully capping it since Armour Pen and Accuracy (although you can do just fine being 5k under cap with accuracy) are considered more important. After this dump as much as you can into power.
Defense
Hit Points are still king when it comes to defense. Stack as much as you can. You’ll end up picking up some defensive stats from gear no matter what you try and do. However, the critters in mod 18 hit pretty hard, so getting as close to the 85k Defense cap will help.
Always bear in mind that how you manage your stats on your toon is your responsibility. I can list information on ways to get there, but ultimately it’s up to you which route you take.
Leveling
The leveling phase of the game may not be the most important, after all you don’t spend that long actually doing it anymore. Nonetheless, presenting an endgame guide/build to a brand new player poses problems of its own. I hope that this section will help with some of those issues. It will not be a full map on what to do during the leveling process (although I shall add some useful tips), this will focus primarily on what powers to take in earlier stages and when to switch these out for other powers etc.
The very early stages will mean you are quite restricted in your choice of powers, so I’ll start this section from when you reach level 8 and have access to all three encounters. You won’t need to worry about gear during this time, just slot whatever new gear you pick up that is recommended you equip. We also won’t deal with ST/AoE loadouts.
First port of call once you’ve completed your introduction quests is to get into a guild. Hit the Guild Registrar in Protector’s Enclave or use Find a Guild in the Social section of your options. Equip their power boon, HP boon and XP boon.
Eldritch Blast will be your main at will, with Dark Spiral Charge as a backup for a bit of burst. For encounters use Arms of Hadar to drop a curse on enemies, follow this up with Blades of Vanquished Armies, with Vampiric Embrace as an extra. Accursed Souls will be your main daily for pretty much all of the levelling phase, with Brood of Hadar being reserved for bosses. You only have one class feat to start with: Dark Prayers. This is going to summon a Soul Puppet to fight alongside you. It’s handy in the early stages for taking some aggro off of you, but will become useful in another way later in the game.
At level 10 (and every ten levels after that) you can assign your first set of ability points. Stack all the way into Dexterity for the Critical Severity and Intelligence for the magical damage boost.
At level 12 you’ll unlock the Random: Dungeon Queue. Start running this and save your AD to purchase a cheap Augment companion and some cheap Bonding runestones. This will boost your power and get you moving through the levelling phase quicker. A good starter Augment is the Energon. It’s cheap and comes at purple quality. Once you get endgame and are able to make more AD you can swap this out for something else. R8 Bondings are super cheap on the AH, but if you can push for R9s, do that. Make sure to send your companion for training whenever you log off from the game.
At level 16 Knox will give you a quest to acquire a companion. You’ll eventually be picking up an augment for stat boosts, but in these early stages of the game the Apprentice Healer will help to keep you alive nicely during battle, whilst your Soul Puppet does a bit of tanking for you.
At level 21 you will receive the quest Artifact Facts from Sergeant Knox. Choose the Lantern of Revelation as that artifact is used even in endgame. The rest suck.
At level 24 switch out Vampiric Embrace for Curse Bite. This power acts a bit wonky at times, but will serve as a finisher for multiple enemies rather than just one.
At level 26 you can slot the All Consuming Curse class feature if you’re tired of AoH failing to place a curse on enemies, or in order to re-apply curse after one hit of Curse Bite.
At level 30 you get to choose your paragon path. You’ll be choosing Hellbringer which is the DPS paragon. You’ll be able to chew through the content and get into the beginnings of endgame much easier than trying to heal your way through with Soulweaver. You’ll switch out Arms of Hadar for Fiery Bolt and use this to place a curse on mobs.
At level 33 switch out Eldritch Blast for Hellish Rebuke.
At Level 37 switch out All Consuming Curse for No Pity, No Mercy.
At level 40 you will be able to pick your first feat. Pick Double Scorch.
At level 50 pick Parting Blasphemy feat since we’ll be using Curse Bite for quite a while during the leveling phase. It will need to be changed at endgame, but you get a free retraining token from Sybella Artis anyway.
At level 60 pick Risky Investment feat. This will synergise with Dark Prayers and buff your encounter damage.
At level 70 pick Creeping Death feat.
At level 72 switch out Dark Spiral Charge for Hand of Blight.
At level 77 switch out Fiery Bolt for Hellfire Ring.
At level 80 pick Soul Scorch Recovery feat.
Congratulations! You’ve hit level 80, completed the game and can now uninstall it and walk away feeling satisfied! Only none of that is true in the slightest. Endgame begins now, so go see Sybella Artis about that retraining token and begin following the setups below.
Powers and Feats
Single Target

Hand of Blight, Hellish Rebuke.
Blades of Vanquished Armies, Hadar’s Grasp, Killing Flames.
Tyrannical Curse.
All Consuming Curse, Deadly Curse.
Double Scorch, Warlock’s Curse, Risky Investment, Creeping Death, Soul Spark Recovery.
HR, HoB, BoVA, HoB, Killing, HoB, Hadar, Soul Scorch, HR, HoB, BoVA etc, etc. Keep stacking those RI stacks, punching out this rotation HR, HoB, Swarm, Tyrannical, BoVA, HoB, Killing, HoB, Hadar, Envenomed, Soul Scorch, HR, HoB, BoVA etc, etc at max stacks and max Souls Sparks for solid single target damage. Although I have placed Soul Scorch at the end in that rotation, it can be cast anytime you hit between three to five pips to get those encounters up quicker.
Hand of Blight – The fastest spark generating at will we have in our arsenal. We have to cast this whilst in melee range, not just for the faster cast time, but in order to receive the added effect of gaining a Soul Spark whilst attacking. It also has the added perk of being one of our better sources of action point gain.
Hellish Rebuke – This is a secondary at will for spark generation. The DoT portion generates a spark for every tick, so it’s good to have it ticking away in the background whilst we slap the enemy around with Hand of Blight. Cast this at the start of the rotation and/or just after we cast Soul Scorch at the end of the rotation and after every Soul Scorch.
Hadar’s Grasp – Ticks 6 times when used with the curse synergy function, and procs weapon enchant on every tick. We primarily use this power to stack Soul Investiture via the Risky Investment feat choice.
Blades of Vanquished Armies – This encounter will send your spark gain into hyperdrive and compliments melee HoB perfectly, offering good DoT damage shredding everything around you with consistent critting. Furthermore, unlike Hellfire Ring, BoVA procs weapon enchants on every tick of its DoT, including the extra curse synergy ticks. Good execution of the ST rotation in conjunction with BoVA, can have you reducing the cooldown on Hadar’s Grasp by 6 seconds. This gets you to that next stack of Soul Investiture much quicker.
Killing Flames – We don’t do much burst damage, but in terms of ST damage this is the best we have. We need to make sure we hit this at the end of the rotation (preferably with full sparks, and eventually with max SI stacks) to really get the most out of it. It currently places a Curse on the target, however the curse is bugged and it’s duration is much shorter than the standard curse duration.
Hellfire Ring – This can be used as an alternative to BoVA. Rubbish casting, but has solid DoT damage. HfR will only proc weapon enchants on the initial hit, but that will be for the initial hit on each enemy within your target area. Sadly, does not proc weapon enchants on the DoT ticks, but we don’t really have many other options as the rest of our powers leave a lot to be desired.
Tyrannical Curse – Whilst Brood of Hadar has a higher magnitude, making it seem more attractive as a ST daily, TC is much better overall due to it’s extra functionality. TC hits hard enough anyway, but the extra twenty seconds worth of 15% debuff on the enemy allows us to really drive home some damage with our encounters after we’ve cast it.
All-Consuming Curse – Allows our at wills to apply a curse to our target. We make up a good portion of damage by pairing this with our second class feature.
Deadly Curse – Curse deals 25 magnitude damage whenever a curse is applied to an enemy. We’re going to be slapping curses on our target extra fast with melee HoB, pretty much non-stop in fact (GWF at will spam is back, but on Warlocks). It may seem tempting to take Dust to Dust over this, but as mentioned before, 5% extra on low magnitude powers doesn’t currently outweigh adding an extra source of damage.
Area of Effect

Hand of Blight, Hellish Rebuke
Hellfire Ring, Blade of Vanquished Armies, Fiery Bolt/Killing Flames
Accursed Souls, Tyrannical Curse
Dark Prayers, No Pity No Mercy (solo or lazy group play) or Dust to Dust (non-lazy group play)
Double Scorch, Warlock’s Curse, Risky Investment, Creeping Death, Soul Spark Recovery
We’re getting up close and personal with this one! HfR curses targets, BoVA and melee Hand of Blight will turbo charge your soul spark generation, FB or KF is extra damage. Throw in a Soul Scorch to reduce your cooldowns. Dark Prayers will synergise with Risky Investment, so if you can zoom from mob to mob quick enough, you can keep that sweet 20% encounter damage going. Throwing in a HR after you cast SS will also help with extra spark gen.
Hand of Blight – The fastest spark generating at will we have in our arsenal. We have to cast this whilst in melee range, not just for the faster cast time, but in order to receive the added effect of gaining a Soul Spark whilst attacking. It also has the added perk of being one of our better sources of action point gain.
Hellish Rebuke – This is a secondary at will for spark generation. Since we’re using the NPNM class feature, this gives us a little bump to our spark generation before we slap the enemy around with Hand of Blight. Cast this at the start of the rotation and/or just after we cast Soul Scorch at the end of the rotation.
Fiery Bolt – This does reasonable damage and is used early in the rotation to place a curse on a group of enemies. Arms of Hadar is still weak compared to FB. The magnitude, even combined, is weaker. Factor in the limited range and arc of the power (as well as not striking enemies on uneven ground), and you end up with a lack of reliability.
Blades of Vanquished Armies – This encounter will send your spark gain into hyperdrive and compliments melee HoB perfectly, offering good DoT damage shredding everything around you with consistent critting. Furthermore, unlike Hellfire Ring, BoVA procs weapon enchants on every tick of its DoT, including the extra curse synergy ticks.
Hellfire Ring – Rubbish casting, but has solid DoT damage. HfR will only proc weapon enchants on the initial hit, but that will be for the initial hit on each enemy within your target area. Sadly, it does not proc weapon enchants on the DoT ticks, but we don’t really have many other options as the rest of our powers leave a lot to be desired.
Accursed Souls – One of the best AoE dailies in the game. Hits hard and synergises well with Risky Investment. I just wish Warlock AP gain was better, so that we could use this more often.
Dark Prayers – An absolute must have for AoE as it allows us to make us of the RIsky Investment feat as we zoom from mob to mob, keeping up a damage buff to our encounters. You do not need to be the person killing the target, so other dps actually help us with SI uptime.
No Pity, No Mercy – Perfect for solo play as it forces combat advantage on crit, which will give us a bigger damage boost solo than Dust to Dust. Still useful in group play if you are feeling lazy.
Alternative:
Dust to Dust – Take this in group play when actually positioning correctly. Sadly, 5% damage on powers that have low magnitudes, doesn’t add up to much more, but it helps a bit.
Feat Choices
Double Scorch – We are going to be using Soul Scorch a lot in our rotation, so the extra DoT works well for us. The Warlock’s AP gain is absolutely terrible, and our spark generation is going to be so high that Power of the Nine Hells is absolutely redundant in both AoE and ST. We can build 12 sparks just as fast in our standard rotation. Wasting a daily to do that is pointless.
Warlock’s Curse – Buffs our damage against cursed enemies by 12%, works great for our AoE after using Fiery Bolt to curse a mob, and is essential on our ST loadout. Parting Blasphemy may work well with a Curse Bite build, doing high damage, but generally runs out of steam quite quickly due to the cooldown factor of Curse Bite making its damage inconsistent.
Risky Investment – Hands down the best option for our third feat, even despite the long time it takes to get to maximum stacks. Buffs our encounter damage by 4% per stack of Soul Investiture that we have, giving us 20% at maximum stacks. The alternative here is Soul Desecration which just isn’t worth it. The puppet’s damage is so minimal that buffing it by 10% is just a waste. I can’t see there being a decent reason to take this feat until they make the puppet do Xuna levels of damage.
Creeping Death – We’re taking this mainly for our ST loadout where we can just keep stacking extra necrotic damage on the boss. Pleasantly enough, Executioner’s Gift also works quite nicely in a boss fight and the two are quite close in terms of damage output. This is a feat choice that you can decide upon for yourself as both work well, but I prefer Creeping Death.
Soul Spark Recovery – A core feat for this playstyle. Reduces our encounter cooldowns by one second per every six soul sparks consumed. Soul Scorch consumes eighteen Soul Sparks allowing us to reduce our cooldowns by three seconds each time we use it. Wrathful Souls also reduces our cooldowns, but due to the puppet being good at getting itself killed, is less consistent and even when the puppet is around, slower.
Boons

Tier 5 I chose Severe Criticism and Quick Turnaround. Welcome Blessings can replace QT if you need the incoming heals, but I’ve got mine covered, so I took a bit of recharge speed. Master boon is Focused Retaliation as AP gain from Blood Lust isn’t working, and the extra damage from the third rank is nice.
The stronghold boons I use are Critical Severity (good to use when you’re comfortably over 150K power, although I hear it works great at lower power levels too), Incoming Healing (combat the Leggings, otherwise Hit Point boon is still solid here) and Mount Speed.
Gear
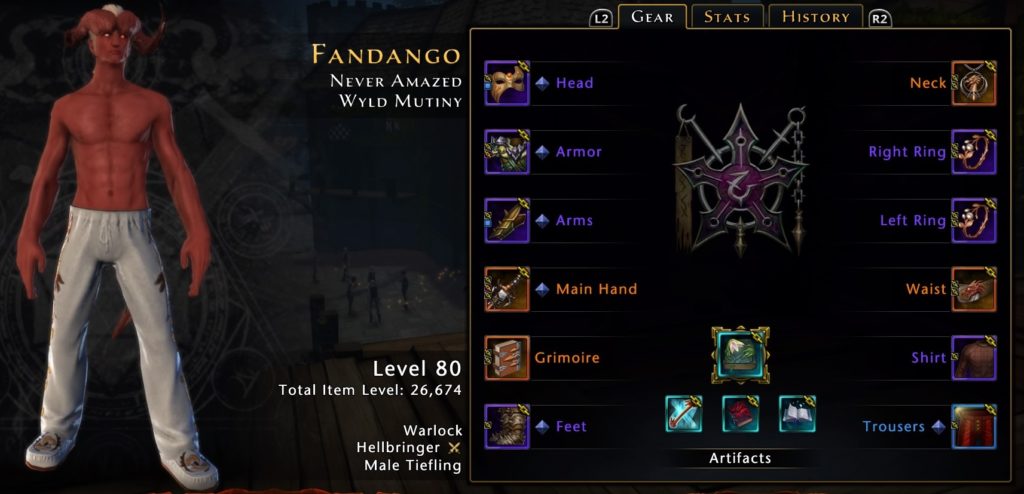
Head
As per usual, a lot of the head piece equip bonuses are average or situational. I’m currently using Fancy Duelist Mask of Cormyr for general bossing and adventuring (cos of stats). For LoMM and ToMM it’s good to rock one of the Protege head pieces for the extra 5% damage in Undermountain. The new Lion’s Guard head piece is good, and if you are able to run Infernal Citadel, you should definitely pick one up.
Chest
Ebony Stained Robes. Excellent boost to your power with Butcher’s Might bonus. Acquired through MEs (non-class based gear rune, Empowered), or LoMM.
Arms
Lion Guard’s Wristguards. These work very nicely on a Warlock, as sometimes it can be difficult to reach the max 5% stacks of Primal. The equip bonus stacks quickly and gives us an extra 5000 power on top of the 7000 power from its raw stats. I run Lion’s Guard with a Barkshield when running ToMM. You’ll need to complete Infernal Citadel a few times to acquire these. Spiked Defender Vambraces are good if you need extra stats and the damage boost is nice, however running Barkshield will prevent proccing the damage buff. I run a Shadowclad instead at the moment, and that enables me to use the Vambraces. I run this setup for all other content outside of ToMM. Primal Arm piece is a great budget piece of gear that can be used in midgame. They have a slightly different Butcher’s Might bonus, so they stack (term used loosely) with Ebony Stained Robes for even more power boosting. Buy from Seal Vendor with Seals of the Crown.
Boots
Rusted Iron Leggings. 5% damage increase is too sweet to pass up. Slot your guilds Incoming Healing boon and/or Tacticals. Should your pocket healer be worth their salt, a single digit figure for incoming heals will be okay. Abomination in Avernus drops this, or get with Juma bags
Rings
Ebonized Raid Ring and Guiding Ring of the Spy. Both of these have the Sniper’s Perk bonus which is one of the only two identical bonuses that actually stack. The rest is just for stats. Ebonized is another ME drop, Guiding comes from ToMM and is available on the AH.
Three Piece Set
The King is dead! Long live the King! Something like that anyway. Orcus was nerfed, making other sets viable at long last. I’m rocking the Mad Dash set as we can keep this bonus up a lot of the time. Apprentice’s Spoils sounds enticing, but our AP gain is rubbish and we can’t squeeze the best out of it like a Warden can. I have been hearing good things about the Dark Remnants set as well. However, I haven’t picked it up yet and can’t personally attest to it. It does look as though it will be a good set for the next mod or two though.
Shirt
Ebony Stained Shirt. Enduring Boots 2.0, now with added stats! Back to the ME’s
Trousers
Velvet Pants +1. Yeah it’s blue gear, but two sets of offensive stats on a pair of pants is good. I find the 2k Combat Advantage useful. Craft or buy from the AH.
Weapon Set
Burnished set (Primal 2.0). Haven’t acquired a Lionheart set thus far. However if you can get it….then…er….get it. Farm ToMM for Lionheart, Farm Seals of the Deep for Burnished.
Main Hand Artifact Modification
Hand of Blight.
Off Hand Artifact Modification
Critical Severity and Power.
Artifacts
For whatever reason I barely ran Tales of Old last year, so I lack the journals. This is my current line-up
Active – Envenomed Storyteller’s Journal with embellishments. Good alternatives for folks that haven’t acquired the ToO sets include: Wyvern Venom Coated Knives (if your stats allow it, Soul Sight Crystal is still good for your personal DPS).
Passive – Darkened Storyteller’s Journal, Frozen Storyteller’s Journal (with embellishments, good for our healer loadout) Halaster’s Blast Scepter. Good alternatives for folks that haven’t acquired the ToO sets include: Staff of Flowers and Trobriand’s Ring.Passive – Halaster’s Blast Scepter, Staff of Flowers, Trobriand’s Ring.
Armour Kits
Major Power kit +1 x 4 – 880 Power each.
Jewel Kits
Major Combat Advantage kit +1 x 4 – 880 CA each.
Gear Equip Bonus
Gear can get outdated quickly in this game, so going back and revising this gear list every time there is an episode or mod release will be beyond my lazy demeanour. However, gear equip bonuses have been given their own names, and appear across various pieces of gear. Below is a list of these bonuses along with recommendations for their use.
Sniper’s Perk – Ranged Powers deal 3% more damage. This bonus stacks, but only twice.
Butcher’s Might – When you damage or heal a target for more than 15% of your Hitpoints, you gain 1% power for 10 seconds (max stack 10). Primal Gloves have a slightly different bonus, same name but only stacks 5 times. This means they stack with one another.
Escalating Might – Gain 250 power when you strike an enemy, lose a stack when you are struck. Stacks 20 times. Great bonus that stacks very fast, and gives an extra 5000 power.
Gluttonous Might – Increases damage dealt by 5%. Decreases incoming healing by 25%. Just make sure you get back to being in positive incoming healing with Tacticals and Stronghold boon if you need some extra.
Challenger’s Might – Increases power by 5000 when fighting against only 1 enemy. Another situational usage bonus. Good for single target boss fights outside of ToMM and LoMM.
Undermountain Hunter – 5% increased damage in Undermountain. Great for LoMM and ToMM.
Escalating Might – Gain 250 power when you strike an enemy, lose a stack when you are struck. Stacks 20 times.
Charged Fury – Deal 3% more damage when over 75% stamina. Pretty good if you only use Shadow Slip for small dodges.
Brute’s Fury – Your Powers deal 0.5/1/1.5/2/2.5% more damage to targets within 25’. Stacks at different ranks. Viable in ToMM.
At-Will Perk – Your At Wills deal 3% more damage. It sounds tempting, but has less overall utility than Sniper’s Perk.
Encounter Perk – Your Encounters deal 3% more damage. Once again tempting, but less utility than Sniper’s.
Tit for Tat – Your At Will and Encounter powers deal 3% more damage, your Daily powers deal 30% less damage. Tyrannical Curse is one of our few and best sources of burst damage, why nerf it?
Critical Charge – 10% chance to gain 25 AP on Critical Hit once every 5 seconds. Warlocks can be pretty good at not critting, so we don’t see a huge amount of benefit from this bonus.
Executioner’s Zeal – Gain 3% Action Points back on kill. Great on trash. Limited usage in a boss fight with adds. Useless in ToMM and other fully single target boss fights.
Encounter’s Reprieve – 10% chance to reduce your CDs by 1 second on Critical Hits. CD reduction is being taken care of by our rotation. It’s a small chance at lowering them further, but it’s not going to make much of a difference.
There are only two equip bonuses that are exactly the same that stack: Sniper’s Perk and Swordsman’s perk. I’ve heard that some builds/guides have stated that the Encounter Perk also stacks. I went back and tested this again (despite knowing the answer already), it definitely does not stack.
Powers affected by Sniper’s Perk
| Eldritch Blast | Yes |
| Dark Spiral Aura | Yes |
| Hellish Rebuke (Initial Hit) | Yes |
| Hellish Rebuke (DoT) | Yes |
| Hand of Blight (Ranged) | Yes |
| Hand of Blight (Melee) | No |
| Arms of Hadar | Yes |
| Vampiric Embrace | Yes |
| Blades of Vanquished Armies | Yes |
| Hadar’s Grasp | Yes |
| Curse Bite | No (See below) |
| Fiery Bolt (Initial Hit) | Yes |
| Fiery Bolt (Proximity Hit) | Yes |
| Infernal Spheres | No |
| Killing Flames | Yes |
| Dreadtheft | Yes |
| Hellfire RIng (Initial Hit) | Yes |
| Hellfire RIng (DoT) | No |
| Accursed Souls | Yes |
| Brood of Hadar | Yes |
| Brood of Hadar Bite | Yes |
| Tyrannical Curse | (Still testing) |
| Gates of Hell | (Still testing) |
| Flames of Phlegethos | Yes |
Curse Bite seems to be having some serious issues. Firstly, it doesn’t appear to be affected by Sniper’s Perk, I’m not sure why at this point, although it could potentially be one of those powers that isn’t classed either as melee or range. Multiple tests with Sniper’s Perk yielded the same results. I then tested CB with the Encounter Perk and the damage was buffed accordingly. Secondly, it appears to fluctuate in terms of damage output. It has a base output of 445 during my tests, but would then randomly drop to 427. The Encounter Perk tests were affected in the same manner, fluctuating from 457 down to 439.
Enchants
Offense
For the time being one Tenebrous, everything else Radiant, everyone loves power. This is what you’ll be aiming for once you’ve reached your offensive caps.
In earlier stages of the game, you may find Silvery, Dark (single stat), Wicked (dual-stat), Gigantic or Draconic (tri-stat) handier for helping you to meet the important caps of armour penetration and accuracy, whilst building some crit or power. Truth be told, it appears the devs are pushing us to a point where we won’t be able to cap all stats, so these multi-stat enchants may make a comeback to endgame someday.
Defense
I’m rocking Brutals now. The HP bump from the Journals has put me in a comfortable place. I took Brutals to bring my defense up to IC caps. Should you not have the Journals, you can use Radiant enchantments for more HP.
Utility
Tacticals for your healer in dungeon runs. Currently I’m running two Dark’s and three Tacticals. Solo, you can slot a Dragon’s Hoard and a Quartermaster if you really need the extra refinement points.
Weapon
I’m using Lightning for AoE, and Bilethorn for ST at the moment. Should you not have much AD income, go with Vorpal as it is a good all-rounder and can also be used on our Soulweaver loadout.
Armour
Barkshield is your main contender here soaking up big hits, however this can prevent your Spiked Defender Vambraces from proccing the damage buff. Elven Battle for Avernus is handy, but not essential. Personally, I’ve been feeling a bit underwhelmed with Barkshield lately and have been running a Shadowclad instead. This allows me to switch in the Vambraces instead of Primal.
Companions
Best tip to get to your caps. Bulette Pup as your summoned, rank him/her up to Epic/Legendary. This will give you a huge boost to your stats, even without the fully endgame gear. Companions make up a huge part of the game now, prioritise upgrading companion stuff over anything one your first page!
Summoned
You’ll want an Augment as your summoned, they give you more stats overall helping you to reach those stat caps. As mentioned above Bulette is great for endgame as it boosts power, CA and defense.
During leveling or midgame, you could run the Goat as your summoned as it boosts crit instead of CA. Once you reach the endgame you’d switch to Bulette anyway. So be prepared to switch, or build for the endgame from the start, it’s your choice.
Enhancement Bonus
Potent Precision – 5% extra crit sev is nice (thanks Chrizpyz), and beats the 2000 power of Potency hands down.
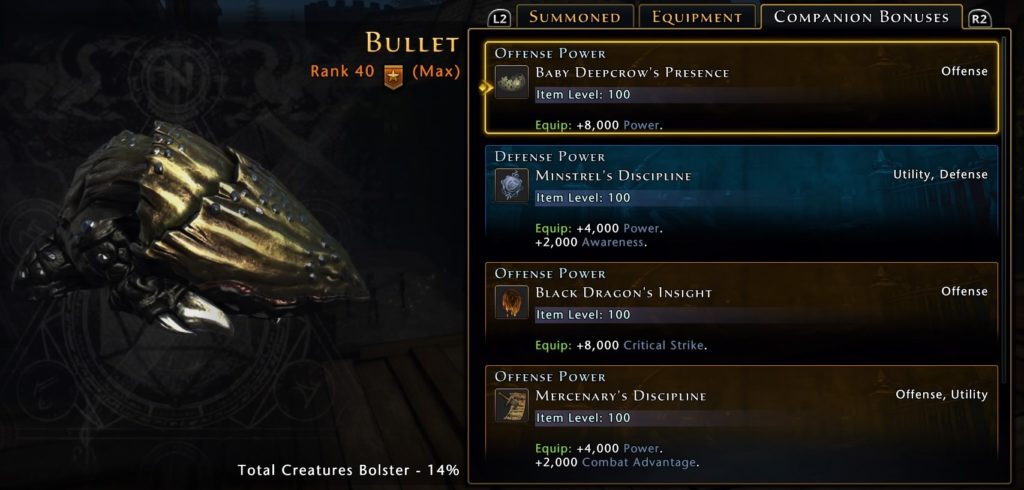
Offense Player Bonus
Deepcrow Hatchling – 8000 power.
Mercenary – 4000 power and 2000 combat advantage.
Black Dragon Ioun Stone – 8000 critical strike.
Ghost – 4000 power, 2000 crit.
Staldorf – 8000 combat advantage.
Kenku Archer – 4000 power and 2000 armour penetration.
Staldorf – 8000 combat advantage.
Cambion Magus/Razorwood – 4% critical severity and 2000 accuracy.
Chultan Tiger – Movement speed is increased by 20% and your power is increased by 6000 for 10 seconds when you enter combat.
Tamed Velociraptor (great for ToMM) and Batiri Runt (Use this on your Single Target loadout) are situational companions that can be swapped in when running dungeons.
Defense Player Bonus
Minstrel’s Discipline – 4000 power and 2000 awareness.
Utility Player Bonus
Archer Guard’s Discipline – 4000 power and 2000 defense.
Owl Bear Cub – Chance at extra damage when you fail to critically hit
Alpha Compy – Increases your power by 5% (if you have one rock it, otherwise LOLZ! Me, I’m poor so I make do without).
Bolster Bonus
This will be relative to the type of companion you have summoned. For me it’s Creatures. Get five to Epic level. Legendary is nice, but don’t make that a high priority.
Companion Gear
Gold Leafed Grimoire – big slab of combat advantage here. Choose it from Yrlakka’s box at the end of Uprising.
Silver Icon of the Companion – armour penetration and crit strike. Farm ME’s for eternity to possibly get this, or be regularly disappointed by Zok.
Imperial Diamond Belt of the Companion – defense and combat advantage. Farm WE’s for this, and more Zok disappointment.
There are all kinds of combinations, I’m lazy though so I’m not going to go into detail here, just letting you know what I’m using.
Companion Runestones
Whatever stats you may be lacking, but ultimately you’re going for as many Empowered as you can. Should you have a piece of companion gear with a defense slot on (like in my example above), take a Profane to make sure you reach the defense cap.
Recommendation
Prioritise getting your augment to Epic/Legendary for a solid stat boost, then bondings to 13 – 15, upgrade Player Bonus companions to at least Epic (eventually Legendary), finish up with upgrading Bolster companions. A good idea to raise Bolster Bonus quickly is to take a look at Rainer’s Pocket Wiki (link below), and use it to find the cheapest Epic companions of the same category on the AH. You can basically jump to 13% for less than 700k AD, easy. I found this worked nicely for me to hit the stat caps ridiculously quick.
Mounts
Combat Power
Swarm for the 5% personal buff and 5% group debuff. Tenser’s disc is also viable. Should all else fail one of the legendary Tyrannosaurs will work.
Equip Power
Arcane Whirlwind or Black Ice Warhorse – 10k power.
War Triceratops – Okay, not offense based but 50k HP is not to be sniffed at.
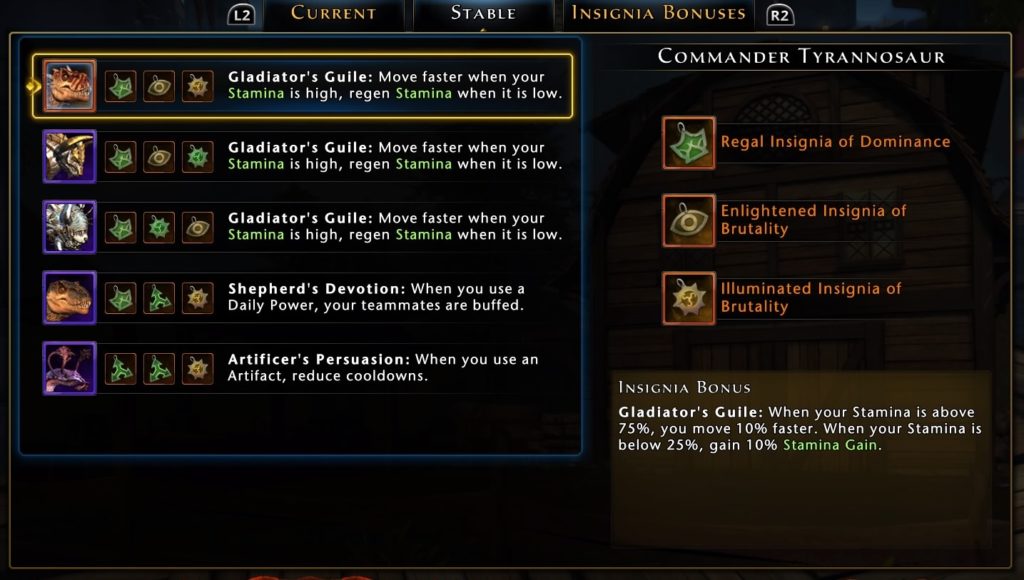
Insignia
Dominance for power and companion influence
Brutality (ouchy, expensive) for power and a dash of armour penetration.
Skill for the CA more than the crit.
Insignia Bonus
Shepherd’s Devotion – Team building!
Gladiator’s Guile x3 – Gotta go fast!
Artificer’s Persuasion – Does not stack, contrary to popular belief!
You can drop SD for Assassin’s Covenant if you’re lacking 1k stats somewhere.
Soulweaver
Soulweaver is a fun and engaging healer class to play. We don’t have the overshields of Paladins, nor do we have the big burst heals of a Cleric. What we do offer is consistent smaller healing, but with the added capability of being able to throw out a load of buffs and debuffs. This is why I find the Tiefling to be a good race for both Warlock roles, as they have the racial bonus Infernal Wrath which can reduce the damage of the target’s attacks by 2.5%. It’s only a little, but it helps your team. Furthermore, the Soulweaver makes a great second healer alongside a Paladin in ToMM.
Ability Scores
We’re still going to take Dex for the crit severity and extra speed boost. Our second option will be Wis for the extra outgoing heals.
Stat Priorities
Offense
No need to bother with ar pen, acc and CA. No, we need to stack as much power as we can to throw out good overall heals for our team. Critical healing is still a factor so you’ll need to stack critical strike, a metric ton of the stuff. To reach the 50% crit chance, you’ll need to multiply your power by 1.25 to see how much relative crit strike you’ll need to stack. Do be mindful of the fact that you should never forsake power for more crit.
Defense
Hit Points are still king when it comes to defense. Stack as much as you can. Life Bind feat means it is also worth capping Defense and Crit Avoid, to help soak up some damage when your team takes some big hits. More importantly, if you’re running ToMM, you need Crit Avoid at 80k, Halaster’s Double Hypothermia attack will crush you if you aren’t capped
Powers and Feats

Essence Defiler, Soul Reconstruction.
Pillar of Power, Shatter Spark, Warlock’s Bargain/Harrowstorm.
Soul Pact, Immolation Spirits.
All Consuming Curse, Warding Curse.
Essence of Power, Mending Mastery, Life Bind, From the Brink, Spark Energy..
Essence Defiler – The final hit gives us two Soul Sparks which helps keep our healing resource pool topped up. Synergises Warding Curse class feature.
Soul Reconstruction – A strong single target heal. Great for healing your tank and also the cocoon phase of Arcturia. Aiming it at one person when your group is huddled together can be…..frustrating.
Pillar of Power – buffs your outgoing healing by 10%, and buffs your team’s damage by 5% (it chucks out a minor heal too), which means this power is sexy! We can no longer have a 100% uptime on this power like pre-mod 16, but it’s still an essential Soulweaver power nonetheless.
Shatter Spark – Forget all the other healing encounters, this is your biggest heal and that’s all that matters (all the others are just salad). Admittedly, it has the highest Soul Spark cost, but not by much. It would take two casts of Harrowstorm to match Shatter Sparks healing ability whilst costing more Sparks.
Warlock’s Bargain – Warlock’s Bargain also buffs our outgoing healing by 10% for 5 seconds, and has a part wide cleanse effect for a relatively low Soul Spark cost.
Soul Pact – My primary daily. Soul Pact buffs you and your teams damage resistance by 10% for 10 seconds, keeping everyone alive and kicking.
Immolation Spirits – Another good spark generator, but it’s best saved as a last resort as Soul Pact offers better overall utility.
All-Consuming Curse – Allows at wills to apply a curse to the target enemy.
Warding Curse – Cursed enemies deal 5% less damage, used in conjunction with ACC and Soul Defiler to keep our safe.
Feat Choices
Essence of Power – Quickly tops up our sparks whilst removing the need to channel. This is best used when you drop down to 3 orbs in order to bring you back to the maximum. One consideration is that there are certain instances where Essence of Time can be useful, like the Trobriand fight.
Mending Mastery – Kind of a no brainer, 5% extra outgoing heals? Yes please!
Life Bind – This feat is key to the build and turns us into a damage sponge for our team mates (redirecting 10% of the damage they take to us), increasing group survivability and giving us a 5% damage resistance buff.
From the Brink – Basically helps us out if we’re absorbing a lot of damage via Life Bind, and keeps us healing by increasing our incoming heals by up to 10% the lower our health falls.
Spark Energy – another no brainer, Action Point gain is hard enough to come by and this is a nice way to get Soul Pact back up in time for those big hits.
Boons

Virtually the same as Hellbringer, just grab the Crit and Defense boons on top of the standards. Tier 5 we take Severe Criticism and Blessed Touch. Master Boon is Blessed Advantage for a little extra power.
Stronghold boons are Critical Severity, either Hit Points or Defense, and Mount Speed.
Gear

Head
Currently the Protege’s Charmed Hat for the crit. I’ll be stepping up to the Lion Guard’s Mystic Cowl once I’ve run IC enough for the higher crit and equip bonus that grants an extra 5k power when your stamina is above 75%.
Chest
Ebony Scalemail, it has Butcher’s Might and a bit of deflect.
Arms
Primal Arm piece. More Butcher’s Might, more POWAAAHHHHH!!! I’m informed that the Lion Guard’s Mystic Wristguards are allegedly better than Primal, I haven’t picked up a set yet and haven’t played with them, but my source is solid. Healthy dose of crit and another power stacking bonus. Grab Primal if you are unable to run IC at this point. Another option is the Shielded Defender Vambraces as they help mitigate some Life Bind Damage.
Boots
Infernal Forged Cuisses for crit and the equip bonus is useful for stacking power in longer fights.
Rings
Okay, so this is the FUBAR part of the build. I’m using Striking Ring of the Master x2 to stack crit sky-high. The equip bonus is completely useless, but oh man the crit is hitting the fan!
Three Piece Set
I’m using the Wyvern set for the 5k power and 5% outgoing damage buff for the team. Stack this with Pillar of Power to get lots of love from your DPS.
Shirt
Infernal Forged Ward Shirt. Crit and AP gain.
Trousers
Ebony Stained Raid Trousers, little bit of defense and some damage reduction helps with Life Bind feat.
Weapon Set
Burnished set (Primal 2.0). Haven’t acquired a Lionheart set thus far. However if you can get it….then…er….get it.
Main Hand Artifact Modification
Enhanced Soul Reconstruction, 10% more healing for this at will.
Off Hand Artifact Modification
Critical Severity and Power.
Artifacts
Active – Frozen Storyteller’s Journal
Passive – Wyvern Venom Coated Knives, Darkened Storyteller’s Journal, Envenomend Storyteller’s Journal.
Alternatives should you not have the Journals include: Halaster’s Blast Scepter, Trobriand’s Ring, Staff of Flowers and Erratic Drift Globe.
Armour Kits
Major Power kit +1 x 4 – 880 Power
Jewel Kits
Major Stamina Regeneration Jewel +1 x 4 – For those “oh shit” Shadowslip moments.
Enchants
Offense
Radiants, power!
Defense
Radiants for the lovely HP.
Utility
Tacticals wouldn’t hurt, but you should be healing yourself well enough anyway. Darks for extra stats are just as good here, mix and match if you want.
Weapon
Vorpal boosts the critical severity of our crit heals, BiS for heals.
Armour
Shadowclad synergises with Life Bind nicely, helping to build our deflection and damage resistance and mitigating the effect of Life Bind. The daze and stealth effects are just nice little touches.
Companions

(My companions are always asleep for some reason)
Summoned
Polar Bear Cub is our healer augment, his augmentation power boosts power and crit (no surprise). However, unlike our Bulette Pup, he belongs to the Beasts category. This means you’ll need to rank up even more companions to max your Bolster Bonus. Everyone loves an AD sink!
Enhancement Bonus
Potent Precision is the way forward, chance at extra crit severity.
Offense Player Bonus
Faithful Initiate’s Wisdom – 10% outgoing heals and 2000 CA (note this is the Faithful Initiate from the Zen Store. There are two different Initiates with different bonuses. You want Zen Store Initiate, which is still available on the AH)
Neverember Guard’s Discipline – 10% outgoing heals and 2000 awareness.
Sellsword’s Distinct Discipline – 10% outgoing heals and 2000 accuracy.
Defense Player Bonus
Radiant Insight – 10% outgoing heals and 2000 deflection.
Utility Player Bonus
Baby Polar Bear’s Instincts – 10% outgoing heals and 2000 defense
Bolster Bonus
Beasts. Start off by using Rainer’s Pocket Wiki, and find the cheapest purple Beast companions that you can from the AH.
Companion Gear
Gold Icon of the Companion – Huge slab of crit strike and two offense slots. Probably going to take another toon through Uprising to get a second one of these.
Rose Gold Icon of the Companion – More crit, but only one offense slot
Regal Critine Ring of the Companion – More crit and some Crit Avoidance with one offense slot. A “tide me over” piece until RNG stops pooping on me.
My ideal companion gear would be this:
Gold Icon of the Companion – 12120 Critical Strike.
Spiked Belt of the Companion – 4848 Defense and 7272 Critical Strike.
Regal Topaz Ring of the Companion – 7272 Critical Strike and 4848 Critical Avoidance.
Companion Runestones
Empowered, Profane and Enigmatic.
Mounts

Combat Power
Commander or War Painted Tyrannosaur for that solid 10% debuff. The Griffon is also useful for ToMM, although you’ll get more mileage from the T Rex.
Equip Power
Arcane Whirlwind or Black Ice Warhorse – 10k power.
War Triceratops – Okay, not offense based but 50k HP is not to be sniffed at.
Insignia
Dominance for power and companion influence
Brutality (ouchy, expensive) for power and a dash of armour penetration.
Insignia Bonus
Shepherd’s Devotion – Team building!
Gladiator’s Guile x3 – Gotta go fast!
Artificer’s Persuasion – Does not stack, contrary to popular belief!
Not sure if there’s anything better out there mount-wise for healers. I’m lazy when it comes to mounts.
The Curious Case of “Carry Me Xuna!” Combat Companions
Recently we’ve seen a rise in people using Xuna, Batiri Runt and Portal Hound as summoned companions. These guys put out a whole chunk of damage, and are great fun to tinker around with. However, for me at the moment, it’s just a fun hobby to work on in the background. I’m having a nightmare with balancing stats. Nonetheless, I’ll be looking at working on Warlock builds featuring these companions at some point.
Kudos
I haven’t done all of this work. There has been discussion with other Warlocks: Bones, Ramesh, Mirajane, Nabu, Vladek, Chrizpyz made a couple of good suggestions, MaleBot, for confirming my thoughts and being our tastiest 1%er, Aymed for the healer arm piece suggestion (I just don’t heal as much), and pointing out that crit avoid needs to be 85k for ToMM. On separate notes of thanks: Janne for all the game information over the years, and Rainer for the excellent information and tools he provides such as Rainer’s Pocket Wiki and Character Builder. A huge thanks go to all of them for all and any information discussed/provided.
Useful Links:
Janne’s NW Info
http://jannenw.info/
Rainer’s Pocket Wiki
https://docs.google.com/spreadsheets/d/1fP_cUugHdsObvQDzLFijGA-mVm_qLmSy0MI62aTLkDM/edit?usp=sharing
Warlock Discord Server
https://discord.gg/cEY4Rww
It would be fantastic if you could update the Soulweaver section for Mod 19 as much seems to have changed.
great write up and it has helped me a lot returning to the game after leaving when lifesteal was removed. I am trying to locate the blue pants but cannot locate them. I looked at the recipe and it has one slot and not offensive. where can i get the pants? thanks again for a great article
Thankyou very much for your thoughts and info greatly appreciated._ 🙂 also i tried the discord link and it came up as expired could you post another please also much appreciated i’d love to have the collective thoughts of other warlocks at my disposal especially when changes to our powers etc happens so i can feel confident of its effects regarding ny current loadouts._.i too agree with the whole hit em fast idea hfr was takin way too long to cast i run i hr fb kf hr cb cb hb ss hr thats wat im using atm with fast… Read more »
I shan’t lie, it is nice to get tells from people saying: “I didn’t think Warlocks could do damage”. We had some issues with Discord invites (quite a bit to go in to here), feel free to add me on DIscord though: SamFandango#0524 and I’ll send you a direct invite
Interesting build, thanks for sharing. 🙂 My build have some differences, especially on companion choice for ST (batiri +4% vs boss, or netherese usefull on bosses too if the tank does his job) but the overall scheme is the same. For AoE, i play parting blasphemy + deadly curse + curse bite. My act record shows me on a single rotation that it’s a bit more effective. The reason of the single rotation is everywhere except tic, trash mob die under 2-4 sec. Curse bite is the killing blow with 250+85 instead of 250×1.12 = 280 (i have ~200k pow)… Read more »
Hi there, and thank you for the comment! I do mention the use of the Batiri in the Companion section, it’s a situational bonus that I swap in and out when appropriate. I used to run CB quite a lot. Over time though I found it to have less consistancy, due to that cooldown. However, it could be just that I wasn’t using it to its highest potential. Might be something to go back over and look at again. Thank you for sharing that information, and continue to do so. The more good information we have for Warlocks out there,… Read more »
yep Indeed, i found the more mobs are tanky the less CB is effective. If it’s not possible to curse >> cb >> curse >> cb and kill, bova + exec is a better choice. (solo minor heroic in avernus for example)